
Official sources checked on October 24, 2026.
Ice dams form when heat escaping from the house warms the roof deck, melts the bottom layer of snow and lets the water run down to the colder eaves, where it refreezes into a ridge of ice. Water then pools behind that ridge and can work its way under the shingles and into the attic, walls or ceilings. The safe short-term fix is to open drainage channels from the ground or a ladder, never from the roof; the lasting fix is air sealing and insulating the attic and keeping soffit-to-ridge ventilation clear.
This guide is written for homeowners in Ontario and the rest of Canada. It explains why ice dams form, how to tell a harmless icicle from a leak in the making, what to do tonight, what to avoid, and how to stop the problem for good before the next winter.
In this guide
Ice dams at a glance
| Question | Short answer |
|---|---|
| What causes ice dams? | Heat and warm air leaking into the attic warm the roof; snow melts, runs to the cold eaves and refreezes. |
| Main risk | Water trapped behind the ice finds a path under the roofing and into the home. |
| Safe emergency step | Open small drainage channels in the ice from a ladder on stable, level ground. Do not climb onto the roof. |
| What not to use | Axes, picks or hammers, and de-icing salt (sodium chloride), which can damage roofing materials. |
| Snow removal | From the ground, with a wood or plastic roof rake on a telescopic handle; leave the bottom layer of snow. |
| Do heating cables solve it? | They help manage ice at the edge but do not replace ventilation and insulation. |
| Permanent fix | Air seal the attic floor, bring insulation up to recommended levels, keep soffits and roof vents clear. |
| Recommended attic insulation (NRCan) | R-40 to R-60 (RSI 7.1 to 10.6) depending on your climate zone. |
What causes ice dams on a roof
In short: ice dams are a heat-loss problem that shows up as an ice problem. CAA-Quebec’s home advisors put it plainly on their ice-damming advice page (updated February 2, 2026): ice along roof edges “is almost always caused by poor attic ventilation and inadequate soffit ventilation.”
The sequence is always the same:
- Heat escapes from the living space and warms the roof structure.
- The lower layer of snow melts and the water flows toward the roof edge.
- The water freezes when it reaches the colder eaves.
- An ice barrier builds up and blocks normal drainage.
- Water pools behind the barrier and looks for another path, often toward the inside of the home.
Where does the heat come from? Natural Resources Canada’s homeowner guide Keeping the Heat In explains the stack effect: in a heated home, warm air rises and creates higher pressure near the top of the house, so it escapes “through holes in the ceiling and cracks in the walls.” In winter, NRCan notes, the house “tends to operate like a chimney,” with air entering low and leaving through the upper levels and ceiling. Every leak into the attic carries heat and moisture with it.
The usual leak points in the attic floor
NRCan and CAA-Quebec list the same weak spots. Check these first:
- The attic hatch or access door, which NRCan suggests weatherstripping with compression strips.
- Recessed (pot) light fixtures that open into the attic.
- Wires, plumbing stacks and other pipes passing through the ceiling.
- Ducts that run from the house into the attic.
- The space around chimneys.
- Gaps at the top of interior walls and blank spots in the insulation, where NRCan warns heat can “bypass the insulation completely.”
How to tell if you have an ice dam (and when to worry)
A thick, continuous ridge of ice along the eaves, with snow still sitting above it, is the classic sign. A few icicles alone do not prove you have a leak, but they show that water is melting on the roof and refreezing at the edge, which is the same mechanism.
Worry when you see any of these inside the house:
- Water stains or damp spots on ceilings or upper walls near exterior walls.
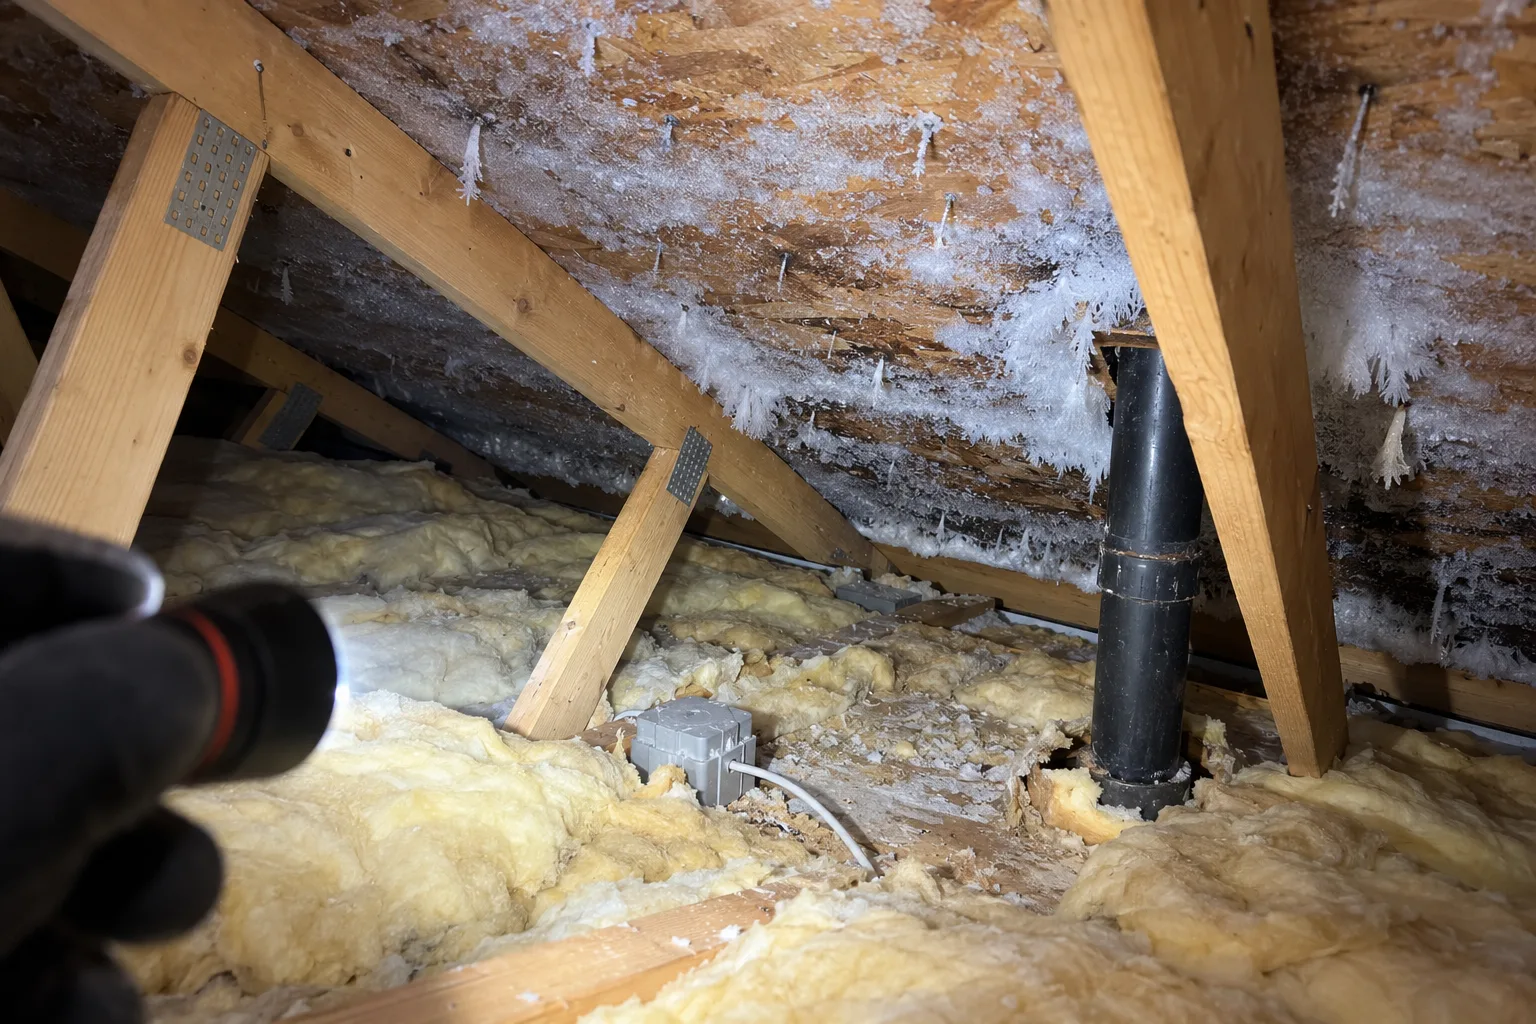
- Frost on the underside of the roof sheathing or on nails in the attic. NRCan explains that warm, moist air leaking into cold outer layers can condense “as liquid or, if it is cold enough, as frost.”
Heavy snow is a separate but related risk. CAA-Quebec’s roof snow guide (updated March 16, 2026) lists warning signs of excessive snow load: unusual cracking or popping sounds in the frame or ceiling, doors or windows that suddenly stick, a sagging ceiling or bowed roof, new cracks in drywall, and water stains indoors. If you notice any of them, removing snow becomes urgent, and a professional is the safer choice.
Safe ice dam removal: what to do right now
The goal is not to remove all the ice. It is to let the water drain before it backs up under the roofing. CAA-Quebec’s method:
- Set your ladder on a stable, level surface and approach the roof edge. Do not climb onto the roof: you risk falling and damaging the roofing membrane.
- Pour hot water over the ice along the natural direction of drainage (down the slope) to cut a small channel.
- Repeat to create several closely spaced channels so meltwater can escape.
- Inside, put containers under drips, move belongings away, and photograph any damage for your insurer.
Removing snow above the ice dam
Less snow above the eaves means less meltwater feeding the dam. CAA-Quebec’s safety tips for roof snow removal:
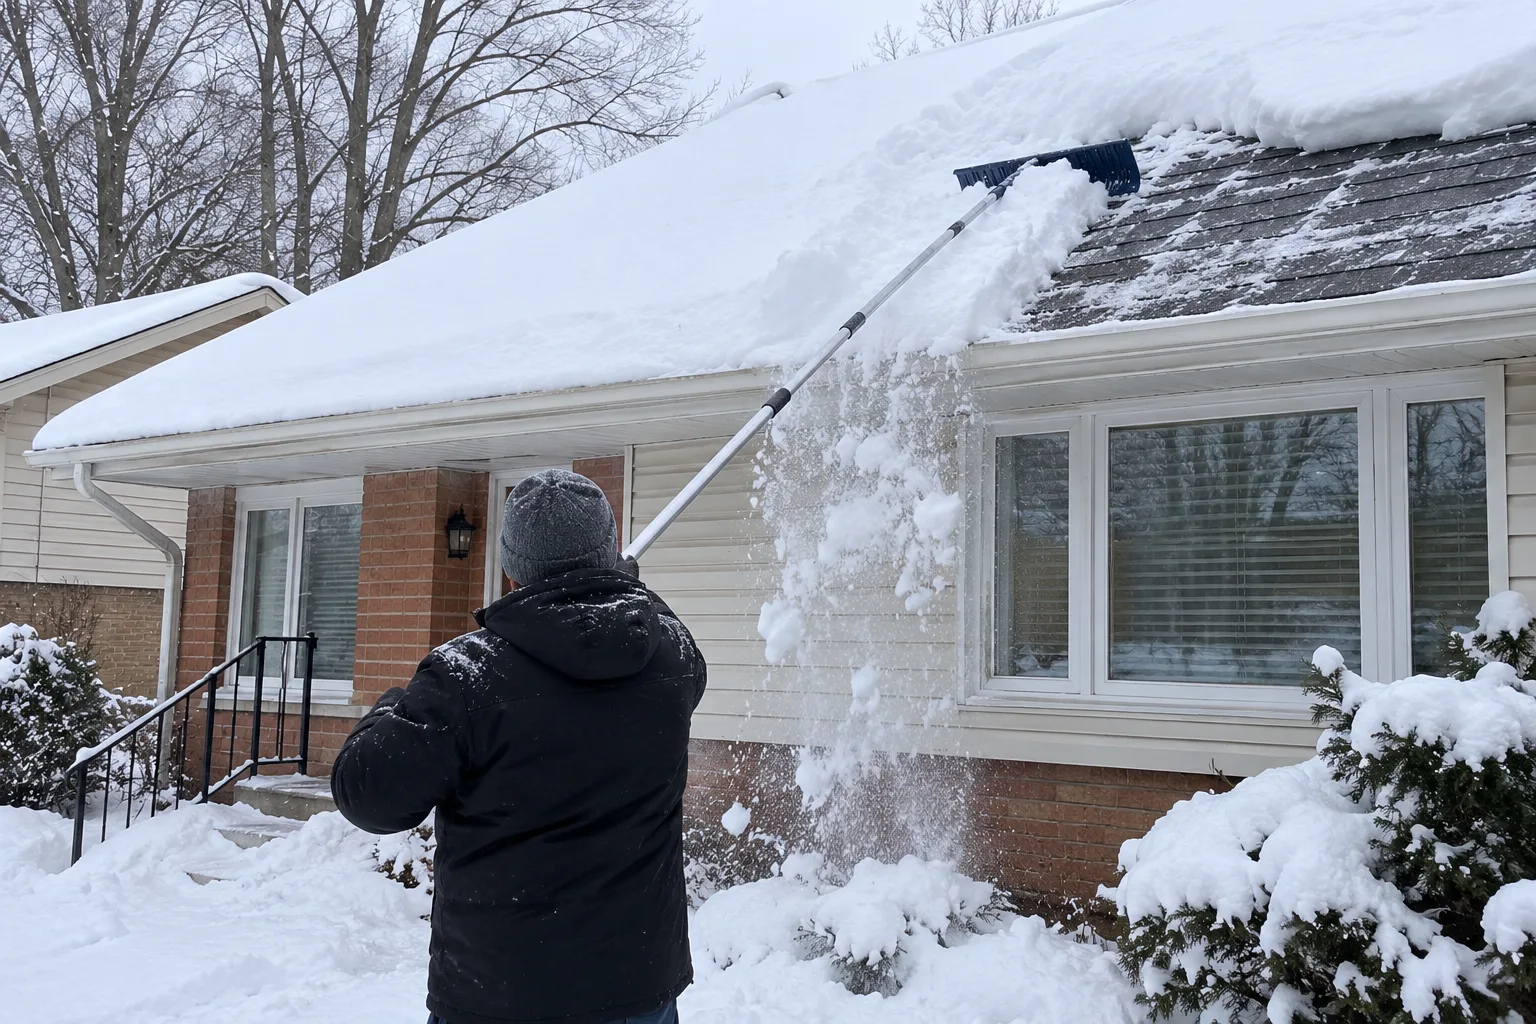
- Work from the ground with a roof snow rake made of wood or plastic, on a telescopic handle.
- If you must work at height, use proper roof safety equipment such as a safety harness and a securely anchored ladder.
- Always have someone with you.
- On a sloped roof, clear the snow from the edge to help water drain at the bottom of the slope. On a flat roof, clear the drain and create drainage channels.
- Leave the bottom layer of snow in place to avoid damaging the waterproof membrane, especially on asphalt shingles.
- Clear roof vents and plumbing vents, and check that gutters drain during freeze-thaw periods.
When to call a professional
CAA-Quebec recommends hiring professionals when the roof is high, flat or difficult to access. If your roof is still under warranty, contact the contractor who issued it before anyone works on it. If water is already coming inside, call your home insurer as well: the claim process and coverage depend on your policy.
What not to do with ice dams
Some common shortcuts make things worse. Avoid these:
| Shortcut | Why it backfires |
|---|---|
| Chopping ice with an axe, pick or hammer | CAA-Quebec specifically warns against breaking ice with these tools. |
| Throwing de-icing salt (sodium chloride) on the roof | CAA-Quebec notes it can damage roofing materials and the roof structure. |
| Climbing onto a snowy or icy roof | CAA-Quebec: you risk falling or damaging the roofing membrane. Work from the ground or a ladder. |
| Scraping the roof down to the shingles | Removing the bottom layer of snow can damage the waterproof membrane. |
| Stuffing batt insulation into gaps | NRCan: glass and mineral fibre insulations are “typically poor air sealing products”; stuffing them into cracks is not effective. |
| Packing insulation against a chimney or pot light | NRCan: insulation must never touch a chimney, combustion vent, exposed recessed light fixture or old knob-and-tube wiring because of the fire hazard. |
How to prevent ice dams for good
The permanent solution is a cold roof: keep house heat out of the attic, and let outdoor air sweep away whatever heat and moisture still get in. Work in this order, because each step makes the next one work better.
1. Air seal the attic floor first
Air leakage is the main driver. NRCan calls uncontrolled airflow through the envelope potentially “the major source of heat loss.” Seal the leak points listed above before adding insulation, using materials made for the job: NRCan’s guide lists pot light covers that seal recessed fixtures from above and are designed for high temperatures, high-temperature silicone around chimneys and vents, and compression weatherstripping for attic hatches. Around masonry chimneys, NRCan says mineral fibre may be acceptable but advises checking with your local building inspector.
2. Bring attic insulation up to recommended levels
NRCan’s table of recommended minimum insulation values for a roof or ceiling, by heating degree-day zone:
| NRCan zone | Heating degree-days | Recommended roof or ceiling insulation |
|---|---|---|
| Zone A | Up to 3,500 | RSI 7.1 (R-40) |
| Zone B | 3,500 to 5,000 | RSI 8.8 (R-50) |
| Zone C | 5,001 to 6,500 | RSI 10.6 (R-60) |
| Zone D | More than 6,500 | RSI 10.6 (R-60) |
NRCan adds that you must install at least the minimum required by your local building code and can exceed these values where it is practical and economical. Check the zone map in the guide for your area.
3. Keep ventilation flowing from soffit to ridge
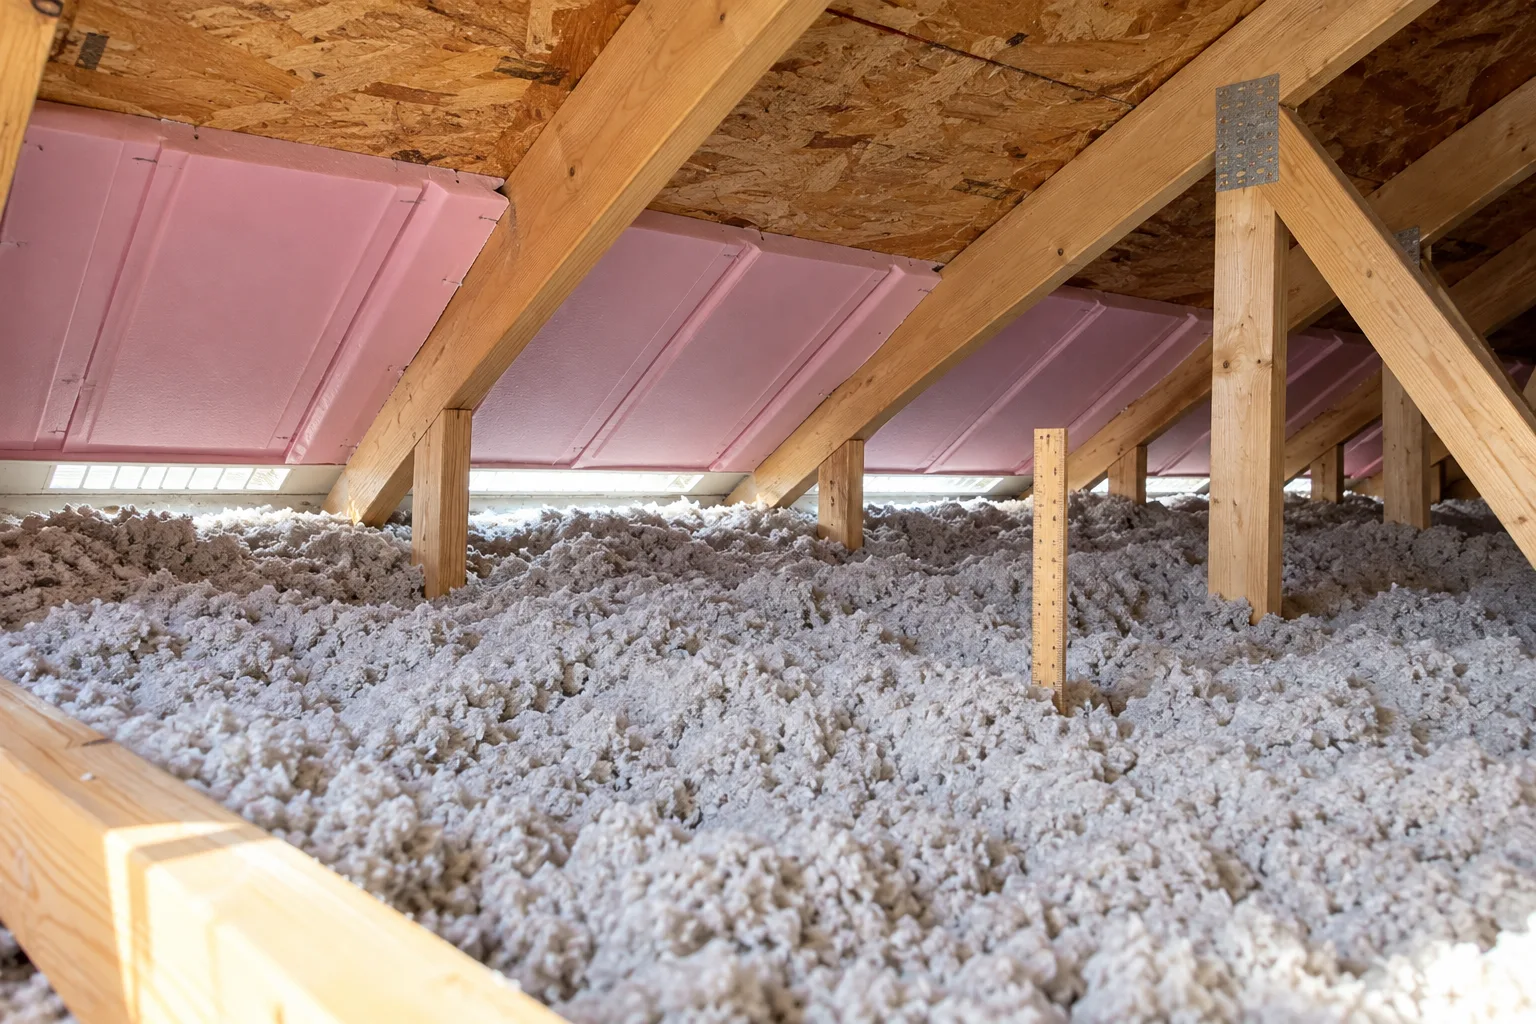
CAA-Quebec describes the airflow an attic needs: outdoor air enters through clear, unobstructed soffits; foam baffles can keep a channel open between the insulation and the roof deck; and warm, moist air leaves through static roof vents placed as close as possible to the ridge. When you add insulation, make sure it does not bury the soffit vents.
4. Manage roof snow in heavy winters
CAA-Quebec’s short version: “No snow, no ice dam!” Regularly raking the lower part of the roof after big storms reduces the meltwater that feeds the dam, while the attic work above removes the cause.
Worked example: how far is your attic from the target?
NRCan gives a simple conversion: R-value ÷ 5.678 = RSI. Here is how to use it with the table above for a hypothetical house whose attic currently has about R-20 (RSI 3.52, NRCan’s own example).
| Step | Zone B home | Zone C or D home |
|---|---|---|
| Current attic insulation | R-20 (RSI 3.52) | R-20 (RSI 3.52) |
| NRCan recommended level | R-50 (RSI 8.8) | R-60 (RSI 10.6) |
| Gap to close | R-30 (about RSI 5.28) | R-40 (about RSI 7.04) |
| Share of target already in place | 40% | About 33% |
How to read it: in both cases more than half of the recommended insulation is missing. Ask insulation contractors to quote the R-value they will add (not just the depth), and ask them to include air sealing of the leak points before blowing in insulation. To measure what you have now, the depth and type of insulation matter; a home energy evaluation will give you a measured number.
In Ontario, attic insulation has been eligible for rebates under the provincial Home Renovation Savings Program. Deadlines and conditions change, so check our Ontario attic insulation rebate guide and the Home Renovation Savings Program overview before you book the work.
Heating cables for ice dams: when they make sense
Roof and gutter heating cables melt paths through the ice at the roof edge so water can drain. CAA-Quebec notes that automated systems can switch on when they detect conditions that favour ice formation, and that cables “are effective for managing ice, but they do not replace proper ventilation and adequate insulation.”
They are a reasonable stopgap on a problem section of roof (a low-slope overhang, a valley over an entry) while you plan the attic work, or where the attic cannot easily be fixed. Buy only cables carrying a recognized Canadian certification mark, and follow the manufacturer’s installation instructions. A cable running all winter on a warm roof treats the symptom and adds to your electricity bill.
To estimate the running cost, multiply the cable’s rated wattage by the hours it runs, divide by 1,000 to get kWh, and multiply by the per-kWh price on your electricity bill. For example, a cable rated 500 W running 10 hours uses 500 × 10 ÷ 1,000 = 5 kWh. A thermostat or moisture controller reduces the hours.
Ice can also build up on a heat pump’s outdoor unit, especially under a dripping roof edge. Our heat pump maintenance guide explains how to clear it safely.
Checklist before winter
- Look in the attic on a cold day: frost on nails or sheathing means warm, moist air is getting in.
- Weatherstrip the attic hatch and seal around pipes, wires, ducts and pot lights (with covers rated for the fixture).
- Measure the insulation and compare with NRCan’s level for your zone.
- Make sure soffit vents are not blocked by insulation; add baffles if needed.
- Check that roof vents near the ridge are clear of debris.
- Clean the gutters so meltwater can drain in a thaw.
- Buy a wood or plastic roof rake with a telescopic handle before the first storm.
- Note your roof warranty details and your insurer’s claim number.
Moisture escaping from the house is also a main reason windows fog up in cold weather; see condensation on windows in winter: causes, humidity limits and fixes.
If the roof needs replacing, estimate it with our roof replacement cost calculator.
Frequently asked questions
What causes ice dams on a roof?
Ice dams are caused by heat escaping into the attic. The warm roof melts the bottom layer of snow; the water runs to the cold eaves and refreezes, forming a ridge that traps more water behind it.
Are icicles on my roof a sign of ice dams?
Not always, but they show the same mechanism: snow is melting on the roof and refreezing at the edge. A thick ridge of ice with snow above it, or water stains indoors, is the real warning.
How do I remove an ice dam safely?
Work from a ladder on stable, level ground, never from the roof. Pour hot water down the slope to cut several small channels so water can drain. Call a professional if the roof is high, flat or hard to reach.
Can I put salt on my roof to melt ice dams?
No. CAA-Quebec warns that de-icing products such as sodium chloride can damage roofing materials. Avoid axes, picks and hammers too.
Should I remove all the snow from my roof?
No. Rake the lower part of a sloped roof from the ground with a wood or plastic rake, and leave the bottom layer of snow in place to protect the waterproof membrane.
Do heating cables prevent ice dams?
They help keep drainage paths open at the roof edge, but they do not fix the cause. Air sealing, insulation and soffit-to-ridge ventilation are the permanent solution.
How much attic insulation do I need to stop ice dams in Canada?
NRCan recommends a minimum of R-40 to R-60 (RSI 7.1 to 10.6) for a roof or ceiling, depending on your climate zone. Seal air leaks first, or the insulation will not work as well.
When is the best time to fix the cause of ice dams?
Late summer or fall, before snow arrives. Attic air sealing and insulation are easier and safer to do when the attic is not frozen and there is no snow on the roof.
Ice dams are only one winter risk for an Ontario house. For frozen pipes, snow on gas meters and vents, alarms and the rest, see our winter home maintenance checklist for Ontario.
The bottom line
Ice dams are a symptom of heat leaking into the attic. This winter, keep water draining with channels cut from the ground or a ladder and rake the lower roof after big storms, without salt, axes or climbing on the roof. Before next winter, seal the attic floor, bring insulation to NRCan’s recommended level for your zone and keep air flowing from soffit to ridge. That combination is what stops ice dams for good. For a Quebec-focused version of this guide, see our article on ice dams on Quebec roofs (in French).
Sources
- CAA-Quebec, How to fix an ice dam problem along the roof edge?, updated February 2, 2026 (read October 24, 2026).
- CAA-Quebec, When should you remove snow from your roof?, updated March 16, 2026 (read October 24, 2026).
- Natural Resources Canada, Keeping the Heat In (Cat. No. M144-41/2012E, © 2017): stack effect, air leakage, Table 2-1 recommended insulation values, air sealing materials (read October 24, 2026).
- Canada Mortgage and Housing Corporation, About Your House: Attic venting, attic moisture, and ice dams (CE13, 1999), catalogue record on Government of Canada Publications (archived).